A function can return any number of results in Golang. Consider the following program as an example.
package main

import "fmt"

func swap(x string, y int) (int, string) {
	return y, x
}

func main() {
	a, b := swap("Hello", 1)
	fmt.Println(a, b)
}
Output: 1 Hello
In the above program you are passing one string and one int from main function to swap() function. And swap function will return two different datatype’s variable at a time. This is so amazing. Even JAVA can not do it that simple. If you want to return multiple values in JAVA, then you have to encapsulate them into a class and then return an object of that class.
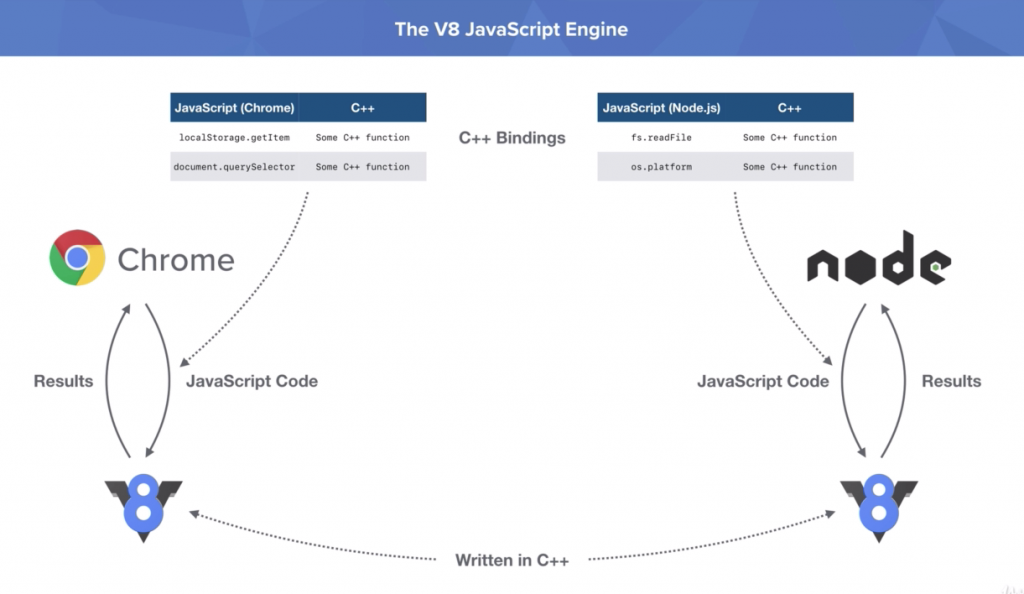
Node.js® is a JavaScript runtime built on Chrome’s V8 JavaScript engine. Node.js uses an event-driven, non-blocking I/O model that makes it lightweight and efficient. Node.js is not a programming language. It is only a runtime for JavaScript. Previously, JavaScript only worked in client side. But by using Node.js, JavaScript also can handle server side requests now.
What is Chromes V8 JavaScript Engine?
V8 is Google’s open source high-performance JavaScript and WebAssembly engine, written in C++. It is used in Chrome and in Node.js, among others. It implements ECMAScript and WebAssembly, and runs on Windows 7 or later, macOS 10.12+, and Linux systems that use x64, IA-32, ARM, or MIPS processors. V8 can run standalone, or can be embedded into any C++ application.
How Node.js works in server side?
Node.js pass the JavaScript code to V8 engine and V8 engine process the code and send the result to Node.js. Node.js and V8 JavaScript Engine are both are written in C++. So V8 Engine can directly interact with machine and the operating system. Google Chrome also use V8 engine to render JavaScript code.
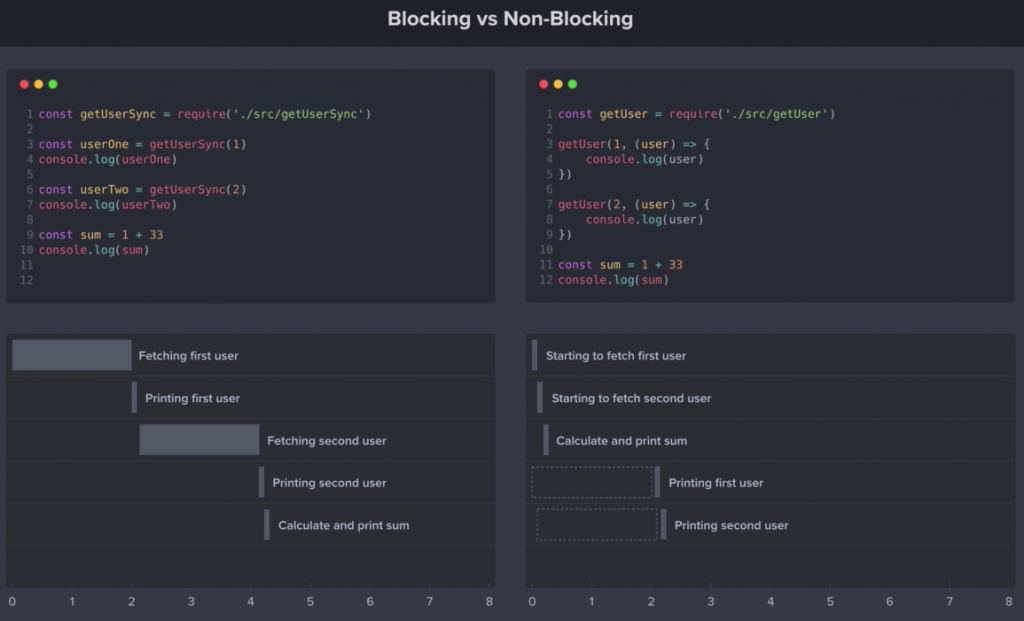
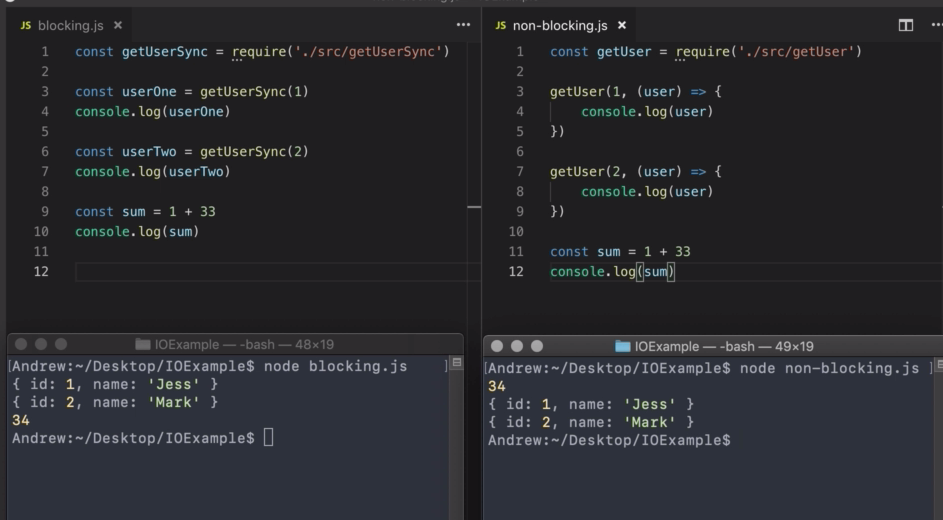
How Node.js uses non-blocking I/O?
Non-blocking I/O defines, when a browser or client sends the JavaScript code to V8 engine, the browser won’t block any I/O operation by waiting for the response.
For the above code, it will first fetch the first user. So second user will wait for fetching the first user. After fetching first user, it will fetch the second user. At last it will calculate the sum.
For the above code, calculating sum will not wait for any of the user fetching. So if the data fetching is getting late, it will print the sum first and after that it will print the user data in a order they are fetched.
That’s all for today. I hope you will enjoy this series. If you have any question please do not hesitate to write in comment.
Kubernetes is an open source platform for managing containerized applications. It allows you to manage, scale, and automatically deploy your containerized applications in the clustered environment. Kubernetes is developed by Google.
With Kubernetes, you can orchestrate containers across multiple hosts, scale the containerized applications with all resources on the fly, and have a centralized container management environment.
In this tutorial, I will show you step-by-step how to install and configure Kubernetes on Ubuntu 18.04. We will be using 1 server ‘k8s-master’ as the Kubernetes Host Master, and 2 servers as Kubernetes workers, ‘worker01’ and ‘worker02’.
Prerequisites
3 Ubuntu Servers
10.0.15.10 k8s-master
10.0.15.21 worker01
10.0.15.22 worker02
Root privileges
Step 1 – Kubeadm Installation
In this first step, we will prepare those 3 servers for Kubernetes installation, so run all commands on the master and worker nodes.
We will prepare all servers for Kubernetes installation by changing the existing configuration on servers, and also installing some packages, including docker and kubernetes itself.
Setup Hosts
Setup Hostname of each PC.
nano /etc/hostname
Put the name of the host for each PC. Then save and exit.
Now Setup static IP for each PC.
nano /etc/network/interfaces
Paste the code given bellow. Just change the IP according to the PC.
auto lo
iface lo inet loopback

auto enp0s8
iface enp0s8 inet static
address 10.0.15.10
In this tutorial, we will be using Kubeadm packages to set up the Kubernetes Cluster. We will install the Kubeadm packages from the official Kubernetes repository.
In this step, we will initialize Kubernetes on the ‘k8s-master’ node. Run all commands in this stage only on the ‘k8s-master’ server. Initialize the Kubernetes cluster using the kubeadm command below.
–apiserver-advertise-address = determines which IP address Kubernetes should advertise its API server on.
–pod-network-cidr = specify the range of IP addresses for the pod network. We’re using the ‘flannel’ virtual network. If you want to use another pod network such as weave-net or calico, change the range IP address.
When the Kubernetes initialization is complete, you will get a kubeadm join … … …‘ command . Copy the ‘kubeadm join … … …‘ command to your text editor. The command will be used to register new worker nodes to the kubernetes cluster.
Now in order to use Kubernetes, we need to run some commands as shown in the result.
Create new ‘.kube’ configuration directory and copy the configuration ‘admin.conf’ from ‘/etc/kubernetes’ directory.
The flannel network has been deployed to the Kubernetes cluster.
Wait for a minute and then check kubernetes node and pods using commands below.
kubectl get nodes
kubectl get pods -o wide --all-namespaces
And you will get the ‘k8s-master’ node is running as a ‘master’ cluster with status ‘ready’, and all ‘kube-system’ pods that are needed for the cluster is up and running.
Kubernetes cluster master initialization and configuration has been completed.
Step 3 – Adding Worker Nodes to the Kubernetes Cluster
In this step, we will add two node workers ‘worker01’ and ‘worker02’ to the Kubernetes Cluster.
Connect to the ‘worker01’ server and run the kubeadm join command that you get from the cluster initialization.